rolling planter box with trellis Natural Cedar Planter Box with L-Trellis
SKU: 67123006910
rolling planter box with trellis

rolling planter box with trellis Natural Cedar Planter Box with L-Trellis

Sale price$19.09 Regular price$21.21
Save 10%

Pay in installments of $5.30 with ShopPay, AfterPay and Klarna

Shipping Estimate
USA
  • USA
  • CAN

Ships within 48 hours · Estimated delivery Jul 3 - Jul 8

Promo Codes Available:

For Your Every Summer RSVP, with Code: SUMMER15

Description

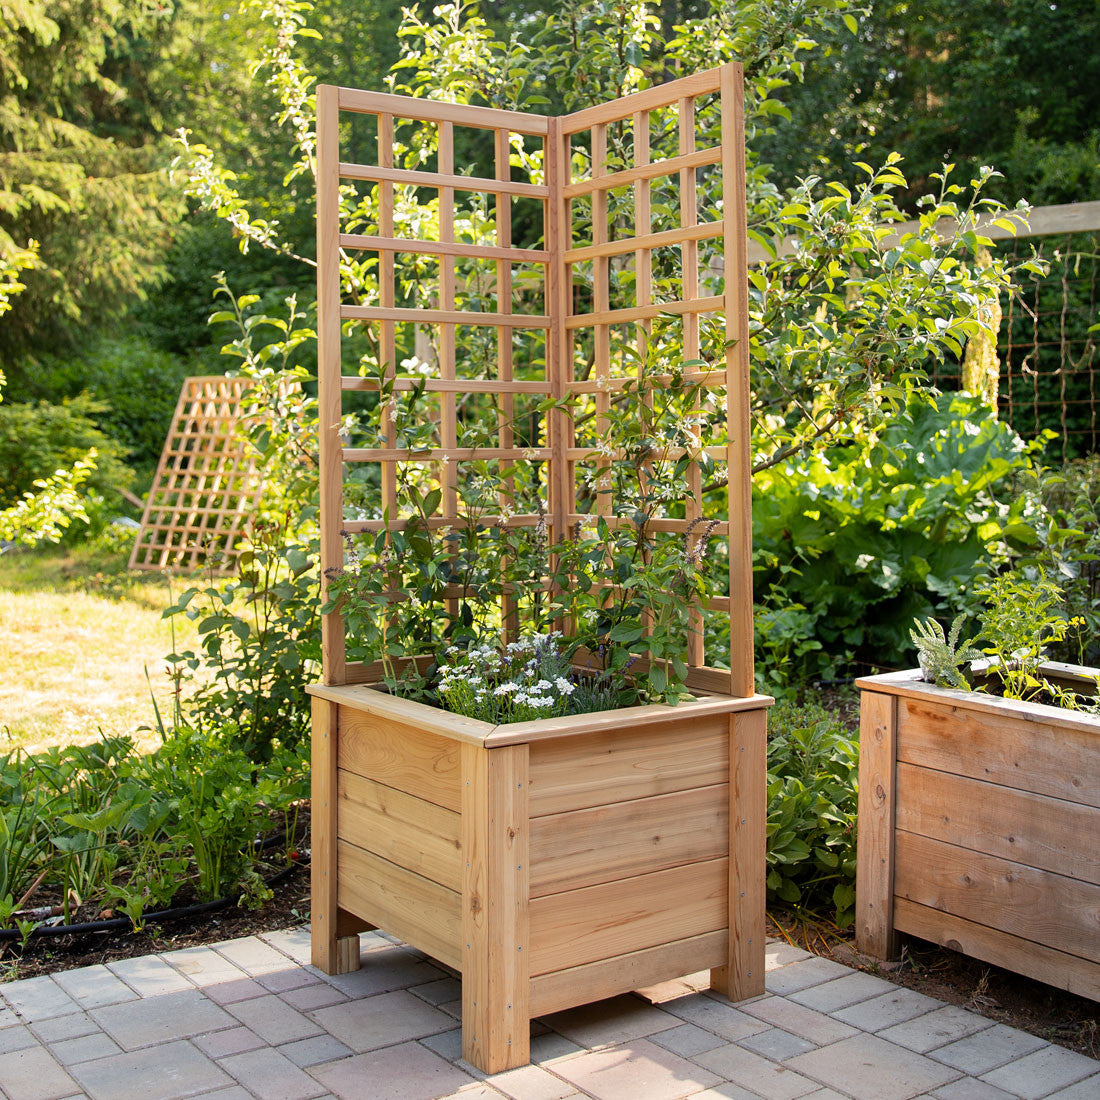
rolling planter box with trellis Natural Cedar Planter Box with L-TrellisMade in The USA Available exclusively at Eartheasy Enjoy lush flowering vines right on your patio! Our new raised planter with trellis combine the functionality of a garden planter with the support of a trellis for climbing plants. Perfect for clematis, jasmine and more, these trellises also make an attractive natural privacy screen. Read more Introducing our new trellis planters the latest addition to our popular line of cedar garden beds and

Made in The USA - Available exclusively at Eartheasy

Enjoy lush flowering vines right on your patio! Our new raised planter with trellis combine the functionality of a garden planter with the support of a trellis for climbing plants. Perfect for clematis, jasmine and more, these trellises also make an attractive natural privacy screen.

Read more

Introducing our new trellis planters - the latest addition to our popular line of cedar garden beds and planters - made in the USA from durable, naturally rot-resistant cedar.

The L-shaped trellis and square planter is great for placing nearby entrances or on the corner of a patio or deck to enclose the space. The trellis structure and climbing plants provide an attractive focal point or backdrop, enhancing your outdoor area. Choose your planter size - either 20" x 20" or 26" x 26" - to suit your space and needs, along with the overall planter depth and trellis height.

Features & Benefits:

  • Solid cedar construction: Unique tongue and groove assembly is strong and lightweight, superior to other wood trellises. Dadoed crosspieces fit together to form a tight grid, we have found stronger than traditional lattices.
  • Privacy screen: Trellis creates a natural screen, combined with leafy vines, to provide privacy and enclose your outdoor space.
  • Grow flowering vines: This sturdy trellis provides reliable support for heavy flowering vines, from delicate clematis to fragrant jasmine, which you can enjoy around outdoor seating areas.
  • Elevated design & accessibility: The raised planter box and trellis brings plants to a comfortable working height, reducing excessive bending or kneeling, making gardening more comfortable.
  • Made in the USA

The L-shaped planter box with trellis stands on 3 1/2-inch legs, so the bottom is lifted off the ground. This protects your deck or patio while making it easy to clean under the planter. As you can see in the photos, there is a bottom beam along the length of the planter, and no beam on either end, so there is a 5 1/2-inch space between the ground and planter on the ends.

The cedar planter box with trellis is high enough to reach without bending or kneeling from a seated position. The garden is easy to access while sitting positioned sideways next to the planter.

Durable Cedar

Planters and trellises are made from kiln-dried cedar. It is a fragrant wood with strong natural oils to protect against moisture and fungal decay. Cedar can be painted or stained, or left unfinished to gray naturally.

We offer Eco Wood Treatment as one option for a sealant. Eco Wood Treatment works by penetrating wood fibers to create a natural buffer against water and fungal decay. It increases wood's durability while creating an aged, silvery patina after just a few hours.

Set Up & Assembly

These raised garden planters with trellis can be set up on any hard surface that is flat and level, such as a patio, courtyard or balcony. For the planter portion, simply stack the boards and insert the stainless steel corner pins. Then attach the trim and planter bottom with included screws. A power screwdriver is recommended. Detailed assembly instructions and all necessary hardware are included.

For the trellis portion, assembly involves arranging the vertical and horizontal trellis cross pieces on a flat surface, then gluing the notches and applying pressure to form a grid. Once the cross pieces are in place, the frame can be attached with included screws, again applying wood glue to the notches where the cross pieces join the frame. The final steps involve attaching the trellis panels to the planter box.

We recommend letting the boards sit in a garage, shed or covered area for 3-5 days to allow the boards to acclimatize to their new environment. This helps to prevent any cupping, warping, and gapping.

Adding a layer of gravel to the bottom of the planter isn't necessary, as the slatted bottom provides good drainage. Optionally, line with landscape fabric to prevent fine soil from washing out.

Shipping Notes
  • Free Standard Shipping on $100+ Orders to the USA.
  • Except Preorder products are shipped in 48 hours.
  • Delivery to the USA:
  1. Standard Shipping : 3-10 business days
  • If time is of the essence, please consider selecting expedited delivery for faster service.
Exchange/Return Notes
  • We offer a 30-day return/exchange service after receiving.
  • Final sale items are not eligible for returns or exchanges.
  • To process your return/exchange, please contact us at [email protected]
  • Please click here for more details>>> Return & Exchange Policy
SKU: 67123006910

Discover Niche Categories That Outsell rolling planter box with trellis

Top-Converting Item to Boost Your Average Order

4.3 ★★★★★
Based on 2384 reviews
Sort
Highest Rating
Newest First
Oldest First
Product Reviews
C
Verified Purchase
Cindy
Birmingham, US
★★★★★ 5
Oxidized fiberglass RV looks new again!
WOW! I researched high and low for a product that would bring back the shine to our 10 year old travel trailer that has fiberglass panel siding. There were countless videos watched, numerous products tried without success and then I discovered PoliGlow Restoration Fiberglass Kit for boats and RVs. It came with the cleaner and pad to remove the oxidation and a bottle of Superior Fiberglass Restoration, Protection and Shine. This product is amazing. The condition on the exterior of our RV had become a bit embarrassing, but now it shines with the newest of them. The instructions are easy to follow, there are even videos of the process! It does require several coats of the Restoration and Shine product. The cost is extremely reasonable for the end result of the RV. The shine is amazing! Highly recommend this product. PS It was extremely easy to apply as I had my husband do it, he didn’t complain at all and was thrilled with the result!
WAS THIS REVIEW HELPFUL?YesReportShare
Reviewed in the United States on July 24, 2025
C
Verified Purchase
CV S.
Charlottesville, US
★★★★★ 5
Wow this stuff works!!
Wow. What an amazing product. I own a 1976 Bertram 42 aft cabin motor yacht. The previous owner had not waxed it in a good long time. I spent a weekend with four friends sweating and laboring using the traditional wet sanding, buffing, and waxing it's heavily oxidized finish. One of the friends helping was a former professional boat detailer. The results were ok. The wax job lasted about six months before it looked like crap. There's a lot of controversy over Poli Glow. A number of the old fellows who sit around drinking coffee in the marina clubhouse swear that nothing should go on a boat except the most expensive and laborious traditional wax, preferably applied by a crew of of professionals. They universally ranted about the failings of Poli Glow despite having no practical experience. They also talk more than they actually boat, so I didn't listen to them. I was cautious, and started with my heavily oxidized flybridge. I wanted to work my way top to bottom and I figured if I hated the look, I could stop and it wouldn't really noticeable. It was easy to use. I bought the complete kit. Mixed the prep. Sprayed and scrubbed. Wow that stuff gets things clean and even. I wiped the Poli Glow on with the provided mitt. Tip: really, you needs to let each coat dry before applying the next. It was noticeable alright. From the dock you can now see an actual reflection of my antennae in the now shiny Fiberglas. It's amazing. I did find that the more oxidized portions were thirsty as heck and took a lot of coats. The results are worth it. Application is way less laborious than buffing and waxing. If you can wipe clean a countertop in your kitchen or galley you can Poli Glow like a pro. It's that stupidly easy. Where the gel coat was reasonably smooth the product built a mirror finish. I didn't even put her on the hard. I applied it while it was docked. I couldn't have five that with a buffer. My pro detailer friend was totally surprised at the result. Bottom line: if you have an older sad looking boat this stuff can make it shiny and happy with minimal labor. Good stuff well worth the price.
WAS THIS REVIEW HELPFUL?YesReportShare
Reviewed in the United States on June 29, 2017
P
Verified Purchase
pdb
Phoenix, US
★★★★★ 4
Overall great product, especially on solid colours.
I bought a 33 year old boat that is mostly white gelcoat. Some of the white had yellowed in areas and there were bright spots where I removed stickers and hull numbers. The boat also has red and blue metal flake that was quite faded and gritty. The flake is large particles of metal or paint or whatever, not fine little glitter bits like they do now. I called Poli Glow Canada and the guy told me to use 600 grit wet sandpaper to smooth out the metal flake and then wash with the Poli Prep. The white came up pretty clean, but I had to use the sandpaper on some areas to take off the yellow. The Poli Glow went on really easily and quickly. When you are doing it, keep an eye on the the edges of the applicator. If the liquid starts to harden, wash the edges in warm water to get them soft again. I didn't do this and have some small bumps kind of like fuzz off a paint roller, which I guess is bits of dried liquid that came off the applicator. You will also get streaks if the edges are dry, but the next coat fixes that right away. Check after each coat to ensure it is smooth. I'm pretty sure a quick pass with the sandpaper would have removed the bumps, but by the time I was finished, I didn't want to mess with it. In the end, the white turned out looking great. The flake is definitely better than when I bought it, but it only shines at about 50% of original (compared to the flake on the transom which was in really good condition) and I was expecting better based on the before and after shots on their site. There are also some streaks in the flake from certain angles where I guess my sanding pressure wasn't consistent.
WAS THIS REVIEW HELPFUL?YesReportShare
Reviewed in the United States on November 26, 2013
T
Verified Purchase
The skinny...
Waukegan, US
★★★★★ 5
I am hard to please...especially expensive products...
K...So I have this 26 ft. sailboat. I have all the professional equipment you can use to restore fiberglass shine. However, a 15 year old sailboat's topside will usually have pitting that you COULD sand down and shine.. but this is a risky step as you think the gelcoat and if you go through, now you have an eyesore of an entirely different nature... My only problem with trying this was the idea that it would fade out shortly and possibly yellow. However, a bigger concern is continued breakdown of the glass surface. An over-riding concern. Wax on a surface that is pitted is usually short lasting and does shine well..good for 3 months, maybe. I bit the bullet and bought this after looking at it's competitors. BUY THE KIT, NOT JUST THE POLIGLOW. The cleaner worked better than any other I have bought. I don't know why. It just did. The scrubbing sponge is perfect for the job. I used a smaller dishwashing scrubber in tight spaces..it seriously was inadequate. This kit was made right, I'm thinking. Following the directions to apply per the bottle. I was skeptical about using a damp mit. I have done the entire cockpit area of the boat at this point with 6 coats and used maybe a half an inch of the product. And the boat looks absolutely AMAZING. Will this yellow? Will it last a year? IDK, but other reviews suggest positive experiences on both counts. Best of all, this will HALT the ongoing beating the topsides takes. (On another note, don't use this on nonskid. It's slick..just my opinion, maybe no more slick than new nonskid. But there is a really great product if you search "nonskid fiberglass surface restorer." Expensive but works.) Best description I can give you on how this will turn out is .. you know how good a surface that is aged looks when you wet it? That..but it stays. Yes, you will need 4-6 coats. But it dries very quickly and still doesn't use much product. At this performance level, the price was worth it. And I am frugal beyond belief. I would recommend that you do professionally buff any fiberglass surface with a good medium one step cutting compound and a professional buffer before you apply this to get best results. DO NOT USE THIS ON SURFACES THAT ALREADY ARE SHINY. It says so right on the kit. I also agree your smoothest outcome will come at room temp vs applying int the sun or significant heat. It dries quickly and doesn't even out as well before drying. Still, it will look great.
WAS THIS REVIEW HELPFUL?YesReportShare
Reviewed in the United States on August 8, 2016
J
Verified Purchase
Jake D.
Los Angeles, US
★★★★★ 5
YOU WILL LOVE IT!!!
This is the best product I’ve ever used on our boat! We have a 26-year-old Tige wakeboard boat that had heavy oxidation and water spots. In addition to a heavily faded gel coat. I spent a few hours working on it and it completely restored our boat! I got the recommendation from my father in law after he used it on his RV. The results speak for themselves. I highly recommend this product!
WAS THIS REVIEW HELPFUL?YesReportShare
Reviewed in the United States on March 21, 2026

recommand products